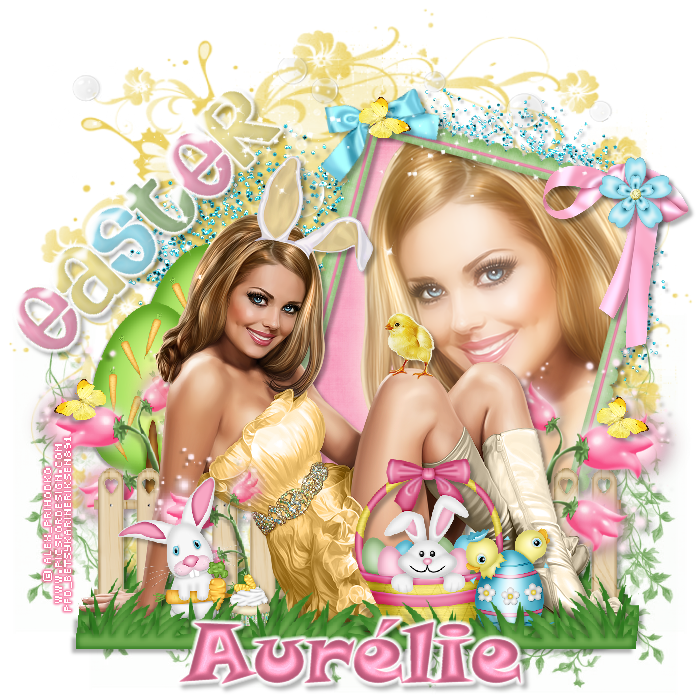
PTU-Relaxing Easter
Written March 3rd-2016
This tutorials is meant as a guide, feel free to make it your own way.
Any resemblance to any other tutorial or tag is purely coincidental.
Supples used :
Paint shop pro. I use an old version , psp 9
Easter girl by Alex Prihodko , at
http://picsfordesign.com
Tube HERE
Easter Bunny kit by Purple Dreams Scraps ( by Aurélie ) which can also be purchased at http://picsfordesign.com
The kit
HERE
Her blog
HERE
I've used 2 diffetent masks , but both from Vix
Vix_EasterMask20102 and Vix_Mask139
Both can be found on her masks page
HERE
Plugins : Alien Skin Eyecandy Impact 5 .
Can be downloaded from HERE
I have used drop shadow V 4 H 4 , 30, 5
(I didn't add Dr Sh. on el,11 and on dust : el.35 or on the masks )
Font :
Snap itc
Abbreviations I use : *Dr.sh = Drop shadow . *Pr = Percecnt. *el. =element from the kit.
Here we go.
File, new image 700 x 700
Select all , New raster , name it yellow mask , paste paper 04 (yellow ) into selection, selection none, add the mask - Vix_EasterMask20102 , merge group, duplicate it once, change the copy blende mode to multiply and merge down.
Add a new raster layer, selct all, paste the Paper 03 into the selection, selection none.Apply the Vix_Mask139 and merge group.resize 50 pr.move it to the right in the middle of your canavas, and duplicate and mirror the copy, dublicate 2 more, and place it down on your layer.
Don't merged those 4 green paper mask layers yet, you may want to adjust those placement when you are almost finish with the tag.
Open el.40 paste as a new layer, on the left site , add dr.sh. ,
duplicate , resize 75 pr., mirror it.
Open el. 11 paste as a new layer .
Open el.21- the fence resize 80 pr.Place it low , add dr. sh.
Open el.23 - the grass, resize 80 pr and so 95 pr. move down bellow el.21 the fence, duplicate the grass resize 95 pr and mirror, so duplicate this again and resize 95 pr and mirrow .So now you have 3 layers with grass behind the the fence with 3 different size and the grass blades go opposite directions .Add el 23 the grass again as a new layer in front of the fence, a bit bellow , resize 95 pr. duplicate , mirror , duplicate and mirror this also.So now you have 3 layers in front of the fence but these are the same size but the grass blades go opposite directions.Don't merge these 6 grass layers yet.
Open the el. 32 a frame , resize 65 pr and rotate 95 right + 15 right, place it on the right site , use magic Wand , selct insite the frame, selct modify, expand 5 , add a new layer, open the paper 02 , paste into selection, move the paper below the frame, paste the tube as a new layer on the pink paper behind the frame , place it right where you want it, using the move tool, selection invert, hit the delete button on your keyboard. Selection none.
Duplicate the tube layer in your frame, and on the copy , adjust , blur, gaussian blur 7 , change the blend mode to screen. Add dr sh. on your frame.
Paste el.27 pink flowers place it in front of the fence and frame, duplicate it and mirror and resize 90 pr , move it below the fence , duplicate again resize 75 pr. and move it in front of the fence also on the left site.
Use el 05 blue ribbon , paste it on the left site of the frame, and mirror it and resize 40 pr. and rotate 12,5 left.
On top of the ribbon I added el.07 yellow butterfly resize 15 pr, duplicate , move it down, duplicate again and mirror , move this up, so that the 2 copied butterflies are in touch with the pink flowers,
Add el 10 pink ribbon , mirrow it and place it on the right site of the frame , remember to add drop shadow on all elements.( except the ones I mention in the beginning of this tut. )
Add el.22 -blue flower , resize 20 pr. place it on top of the pink ribbon.
Behind the pink paper and the frame, on the left site , add el.39 - a tree , resize 75 pr and 50 pr. duplicate it ,
move it down 1 time and move it more to the middle.
Add the tube behind the 3 grass layers , but in front of the fence, place her a bit into the grass, I resized the tube 50 pr. if some of the tube shows below the grass, just use the freehand selection to drag around it and cut.
In front of the tube into and behind the 3 layers of grass I used el 25 resized 40 pr.
el.09 rabbit resized 35 , and el 30 carrot 15 pr.
el. 14 resized 25 pr. and el.26 resized 15 pr.
On the top layer on the left , I added el.35 resized 85 pr and 85 pr again, duplicate it and
mirror it.
Add the el.45 wordart Eeaster resize 50 pr. rotate 45 left.Add Alien skin Eyecandy Imapact 5 gradient glow,
These settings.
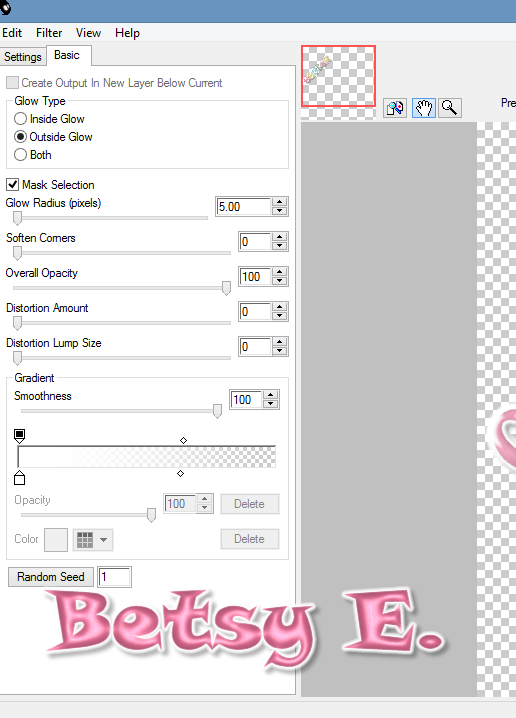
and add dr. sh.
On top layers add el. 35-star dust resize 85 pr. and 85 pr again, place on the left site, and duplicate it and mirror it, be sure to move it up a bit , so it doesn't cover the face of your tube in the frame.
Adjust until you're happy with your tag and merge all the layers visible .
Add the copyright of your tube.
Add your name , I used foreground and background color #f97aa4 and font Snap ITC stroke 0,5 , size 60 , (but for my name I used size 55) right click and convert to raster layer. I used 3D inner bevel these settings :
Add Alien skin Eye candy 5 Impact gradient glow, same settings as on the wordart. Add dr.sh. same settings as for the elements.
Now your done,Thanks for trying my tut, hope you liked it.
Any questions , please just email me betsyfiltrerepost-paradisedreamer@yahoo.com or add your question in the comment .

Ingen kommentarer:
Legg inn en kommentar
Please leave a comment