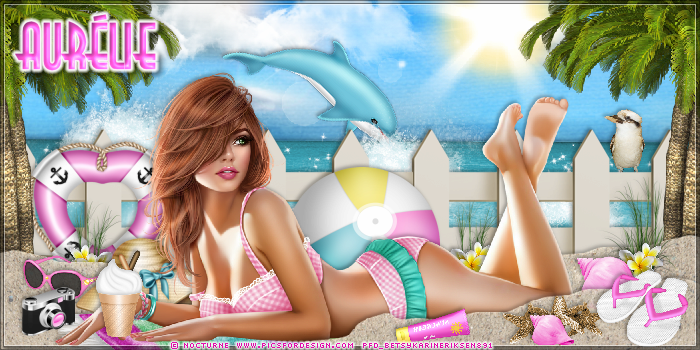
PTU-Tropical Dreams at the beach-watching the dolphin
Nocturne-Forum set .
Written July 15th-2016
This tutorials is meant as a guide, feel free to make it your own way.
Any resemblance to any other tutorial or tag is purely coincidental.
Supplied used :
Paint shop pro. I use an old version , psp 9
I used the tube Swim by
(enter on the artist names for this tube )
© Nocturne
The store :
http://picsfordesign.com
Don't use it without a proper license .
Plugins : Alien Skin Eyecandy Impact 5 .
Can be downloaded from
HERE
AAA Frames -Photo frame
Can be downloaded from
HERE
I have used drop shadow V 2 H 2 , 60, 6
and for the name : 3,3,57,8
I have used a Free font , Angie
Abbreviations I use : *Dr.sh = Drop shadow . *Pr = Percent. *el. =element from the kit.Remember to add dropp shadow and save often and name your layers , so you can easy see what element you working on.
Here we go :
File, new image 700 x 350
Open paper 06 , paste as a new layer
Resize 88 pr
Use el 40 -cloud, resize 40 pr, duplicate, move it a bit, and duplicate it again and mirror it.
I didn't merged these layers until I was finish with the tag, than I could easy adust them .
El. 15-the sea , full size , as a new layer
See where it's naturally to add it.
El 38 resize 50 pr + 75 pr , duplicate 2 times, move them around where you like over the el.15 the sea, merge those 3 together, easier when you have less layers to work with .
El,51-sun, resize 75 twice, duplicate .
El. 44 the dolphin -40 pr , rotate right 45 degrees.
Add el.21-Wave full size, duplicate resize this 75 pr, duplicate this one , move this on the right site, place the middle one over the dolphin's nose/beak,
El.60 - the fence , add it in full size .
El.50 -Bird , resize 20 pr. place on top of the fence, right site.
El. 57 , 30 pr. place it on the left site of the fence,
El.48 - palm tree, resize 75 pr. place it on the right site, in the edge of your image, duplicate , resize 75 pr again, duplicate again and mirror it , also mirror the first one that is only resized once .
El.10-Dune (sand ) resize 85 pr. place it on the right and down on your image, duplicate it ,mirror it, duplicate again and mirror this too. place them on both sites on your image.
Paste el.35 , resize 15 pr , duplicate it 2 times and el.11 resize 10 pr duplicate it 2 times, and place them between between sand layers.
El.13-Sunglasses -25 pr. on the left site.
El.56 -hat, 30 pr.on the right site.
El.67-Ball-30 pr. place it on the middle in front of the fence.
Add your tube, if you use the same as I did, Nocturne(Swim + the towel ), resize 40 pr.
Place her center but a bit down, between the sand layers.
El.42 -25 pr. place it on the right between the sand layers.
El. 27 - Sun cream -15 pr, place on top of your image.
El.41-15 pr. + 90 pr. El. 41 again and 15 pr + 75 pr.
El.42 -15 pr. El,69-sandals -25 pr. on the right site.
El.52-Camera -15 pr.place on the left site.
El. 16-20 pr. place it in front of the tube.
If you happy with elements, tube and masks placements ,
you can merge all layers together, merge visible
Be sure you add AAA Frames -Foto frame before you add copyright and name on , (or you can x-out it and copy merged, and paste in your workspace as a new layer )
Use these settings :

Add copyright and merge down,
Add you name , for my font Angie I use stroke 1,5 , size 45
foreground and background color #e84cc1
Convert to raster layer.
3D Innerbevel with these settings :
Go to effects, plugin
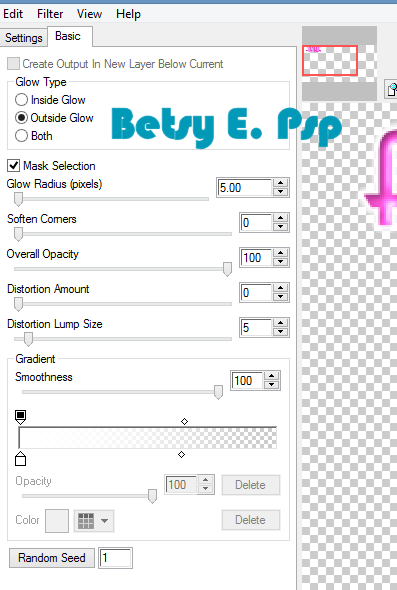
Alien skin Eyecandy Imapact 5 gradient glow,These settings :
Add dr.sh 3,3,57,8
Right click on your layer and copy merged and paste in your workspace as a new layer , save your tag as a png.
For the Avatar, I just open a new image, 150 x 200 pixel, copy elements from your banner, I did resized some elements 75 pr or 80 pr. and also mirrored the ball.
Use the same setting for the AAA frame.and copy your name from the banner, just resize 70 pr. and remember to add the copyright.
Now your done,Thanks for trying my tut, hope you liked it.
Any questions , please just email me
betsyfiltrerepost-paradisedreamer@yahoo.com
or add your question in the comment .