mandag 29. september 2025

I'm still making tags, hopefully I will post some tuts results + some snag-tags soon.

 I'm still making tags, hopefully I will  post some tuts results + some snag-tags soon.


Thanks for visiting my blog, friendly hugs, Betsy E. 


onsdag 26. juli 2023

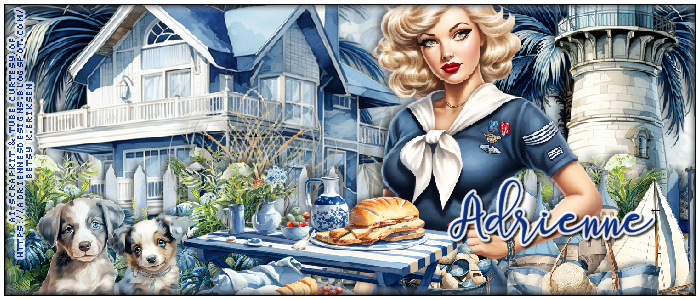
AD-FTU TUT AI Generated-Along The Shoreline-Adrienne's designs-set

 AD-FTU TUT AI Generated-Along The Shoreline

3 Piece Set


This tutorial is of my own creation. I am using old PSP PRO 9 . 

I used Adrienne's AI designs tube and pack
Tubes +elements+ papers  you can find in her  blog (click on the name below: )

The one I used is now longer there but you find the new one below :

"Along The Shoreline"


Check out the rest of her blog, with alot of beauties

https://adriennesdesigns.blogspot.com/

Please leave a thanks when downloading

(on the downloading pages click on the arrow after the top text,
it let you download as a zipped file and will be in each folder)

Masks : Chrissy'sChaos_Mask 26

HERE


Font for name : Summer Landscape

HERE

Drop Shadow : minus 2 , minus 4, +50+10

1. Open a new transperant file 700x700 px

Start with your mask , using the paper you want

I used my croop too, of the paper 2 , so crooped it to 447X447 px, only to get the sea,sky and the sand of it.

Add a new raster layer, selections- Select all , copy and paste the edit of the paper 2 into the selection

2. Copy and Paste El 4-the tree full size, move it to left , duplicate Image- mirror and resize this 75 %

move it to the right.

3. Copy and paste El 3-Lighthouse , resize 90 %, move it to the right

4.Copy and paste El. 1 House the full size , move it to the left

5.Copy and paste El. 5- The fence, resize 50 % move it to the left, image mirror, move it under the orginal fence, and then move to it to the right, so it looks like a long fence, when you're pleased with it, 

then merge  down.

6. Copy and paste El. 24 , image resize 35 %, image-mirror,  move it to the right 

then duplicate the first again, resize it 75 % , move this behind the fence on the left side, then duplicate it and move it to the right side behind the fence
7. Copy and paste El. 14, resize 35 % Image-mirror, move it to the right, in front of the merged fence

8. Copy and paste El. 15 resize 50 % , move it to the right

9, Copy and paste El. 8 resze 35 %

10. Copy and paste tube, I used Adrienne's AI tube 19-4, resize 55 % 

11. Copy and Paste El. 25 , image-resize 25 %

12. Copy and paste EL. 6, image-resize 50 % image mirror, move a bit to the left

13. Copy and paste El. 19 , image-resize 25 % , move it a bit to the left, 

14. Copy and paste El. 18, image resize 35 %

15. Copy and paste El. 20, image-resize 35 %

16. Add the right copyright, if you use the AI tube, please add copyright of some sort

I used Pixelette font size 8, black,only background black, Anti-Alias choose off 

and I wrote ;

AI Scrapkit & Tube curtesy of  

https://adriennesdesigns.blogspot.com/ 

or 
© AI GENERATED ADRIENNE'S DESIGNS

(remember to change the anti-Alias back to smoth again before you add your name)

Check that none of the layers/elements are too close to the edge

If you want to make a Sig
don't merge yet, 

SIG :
Image resize 85 %  resize all layers checked

Move most of your elements up to the middle of the tag, left and right and center, I x-out the copyright 

Then image -Canvas size 700 x300 px, hit the middle center button

If you don't see all the elements you want on the sig, hit the arrow back to undo the canvas size

Move around on elements or/and tube like you want

I duplicated my mask, and mirror, 1 to the right and the other to the left

I also put a new layer on the bottom layer, and filled with white, X-out the copyright , better to put on a new one when you're finished.

Save this sig as "before merged", you going to need all the layers, if you want to make the avatar.

Then merge visible

Then save the sig as merged.

Effects-Plugin -AAA Frames -Fotoframe, I choose white, but change the width to 4

Selct all, contract by 4, add effects-3D buttonize 10,10,80

transperant , color black-OK

Selct none

Add copyright again, I used pixelette size 7 for sig, same settings as the one for the tag.

Then add your name.

Avatar :

Go back to the sig you saved "before merged"
Image-resize , heght 200 pixels, resize all layers checked, then the width should show 467 pixels , ok

Zoom in the sig, by 200 % so you easier see all elements

Move tube,maybe mirror it and the elements, over to the left side

I x-out the mask to the right,  or the elements I don't want for your avatar
Then image-canvas size 200x 200 Pixels-hit the arrow pointing to the left

(it's the middle arrow on the left)

If you don't see all the elements you wanted, just hit the undo arrow to go back before your last canvas

I added the tube again from the original, but image-resize 30 %+ drop shadow, place it to the left edge

and El 19 -dog resize 15 % from the original + mirror + drop shadow
El 18-dog  resize 20 % from the original+ mirror + drop shadow
I also put a new copyright Pixelette size 6 , same settings as before,
Then make a new layer at the bottom

I fill this with white, and deleted the white background I made for the sig.

Before you merge, test it with the font you are going to use for your name, so it will not come over tube-face or the dogs faces
When you are pleased, x-out the copyright, to hide it, it's better to adjust the place after you have merged and added a frame.
So merge all
Add the same AAA fotoframe as on sig,but change the width to 3
then select all, modify, contract number of pixels 3 effects-3D buttonized

but this time : 7+7+80

Select none.

Unhide the copyright and adust to fit your avatar.

Save as finished Avatar as png

That's it.!

For Adrienne 


Thanks for trying my tut !

If you made a tag or a set, even with another tube, please feel free to share it with me, so I can show it off.

Friendly hugs, Betsy K.Eriksen



fredag 24. april 2020

May Delights-Yuki-Snag Tags and a link to a FTU TUT

I have some more snag tags on my  fan page on Facebook
Betsy Paradise Dreamer fanpage albums
but Facebook always add background to the tags, but mine are normally without, but if you like the page, you can keep updated, and I will try to post them in my blog too
(made the tag by following a tutorial)
FTU - May Delights


Translated to English

May Delights-Yuki-Snag Tags
Feel free to snag, but Please KEEP THEM AS THEY ARE
(Just click on each tag first to get them in full size)


FloralityVerymany-Snag tags and a link to a FTU tut

I have some more snag tags on my  fan page on Facebook
Betsy Paradise Dreamer fanpage albums
but Facebook always add background to the tags, but mine are normally without, but if you like the page, you can keep updated, and I will try to post them in my blog too
(made the tag by following a tutorial)
FTU - Florality

Translated to English

FloralityVerymany-Snag Tags
Feel free to snag, but Please KEEP THEM AS THEY ARE
(Just click on each tag first to get them in full size)


DelicateMoonEscada and a link to a FTU tut

I have some more snag tags on my  fan page on Facebook
Betsy Paradise Dreamer fanpage albums
but Facebook always add background to the tags, but mine are normally without, but if you like the page, you can keep updated, and I will try to post them in my blog too
(made the tag by following a tutorial)

FTU TUT-DelicateMoon
DelicateMoonEscada-Snag Tags
Feel free to snag, but Please KEEP THEM AS THEY ARE

(Just click on each tag first to get them in full size)


Celebrate-Vadis-Snag tags and a link to a FTU tut

I have some more snag tags on my  fan page on Facebook
Betsy Paradise Dreamer fanpage albums
but Facebook always add background to the tags, but mine are normally without, but if you like the page, you can keep updated, and I will try to post them in my blog too
(made the tag by following a tutorial)
Celebrate-Vadis-Snag tags :
Feel free to snag, but Please KEEP THEM AS THEY ARE

(Just click on each tag first to get them in full size)


Nadine Beauty-Eskada-Snag tags and link to a FTU tut

Hello , I hope everyone is well.
(all links will open in a new browser)
Just wanted to say I have some snag tags on my  fan page on Facebook
Betsy Paradise Dreamer fanpage albums
but Facebook always add background to the tags, but mine are normally without, but if you like the page, you can keep updated, and I will try to post them in my blog too

(made the tag by following a tutorial)
FTU Nadine Beauty

Here is the first set of snags :
Nadine Beauty-Eskada-Snag tags
Feel free to snag, but Please KEEP THEM AS THEY ARE
(Just click on each tag first to get them in full size)


torsdag 7. februar 2019

Hello everyone, awhile since my last post

Hello everyone
I hope you all are doing great.

It's been awhile since my last post and  update on my blog
Real life seems to come in between +
I had some trouble to fix on my blog too
Hopefully I will soon post some stuff + some snaggable 

Until then , I wish you all a great day !
Betsy xx

fredag 15. juli 2016

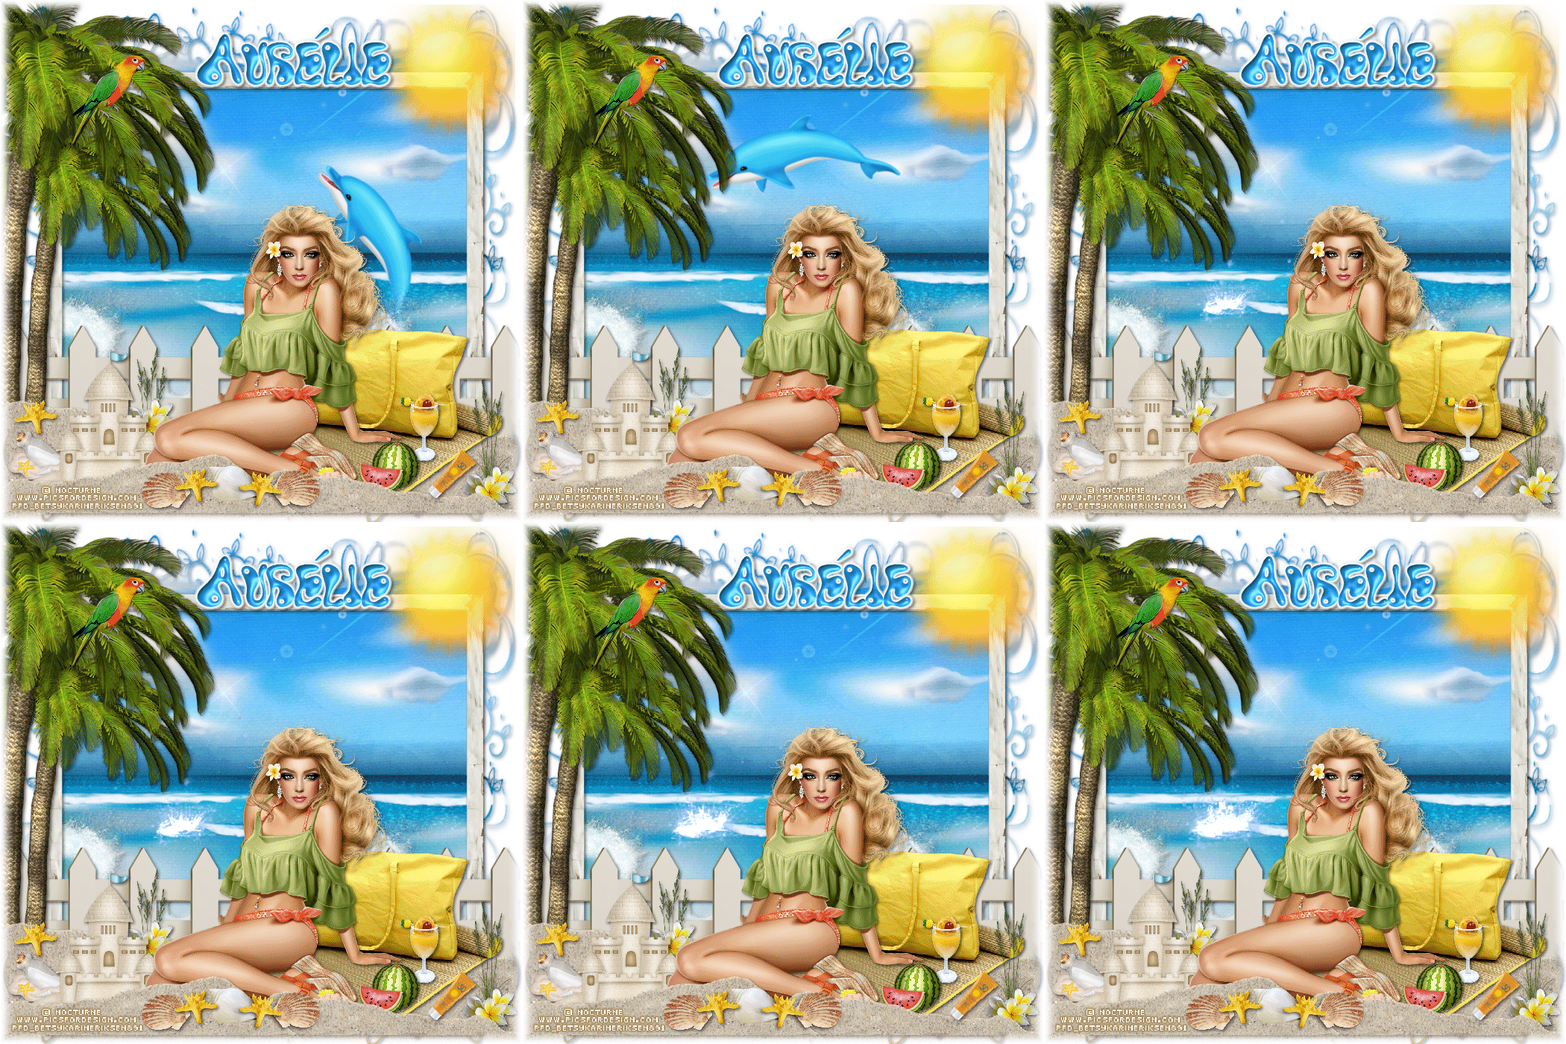
CT-Tag Tropical Dreams-Chill out at the beach-Animated

Tropical Dreams Chill out by Betsy E to Kit maker Aurélie

PTU-Tropical Dreams-Chill out at the beach
Nocturne-Animated tag.

I used the tube Chillax_ by :

(enter on the artist names for this tube )
 © Nocturne

The store  :
http://picsfordesign.com

Don't use it without a proper license .

Sophisticat Simone Animation Package 137

The Store
CDO

kit by Purple Dreams Scraps ( by Aurélie ) which can also be purchased at
 http://picsfordesign.com
The kit
Tropical Dreams
Her blog
Purpledreamsscraps


Zuzzanna mask 10 at her site
HERE
Plugins : Alien Skin Eyecandy Impact 5 .
Can be downloaded from HERE

I have used a Free font , Water Park.


Any questions , please just email me
betsyfiltrerepost-paradisedreamer@yahoo.com
or add your question in the comment .


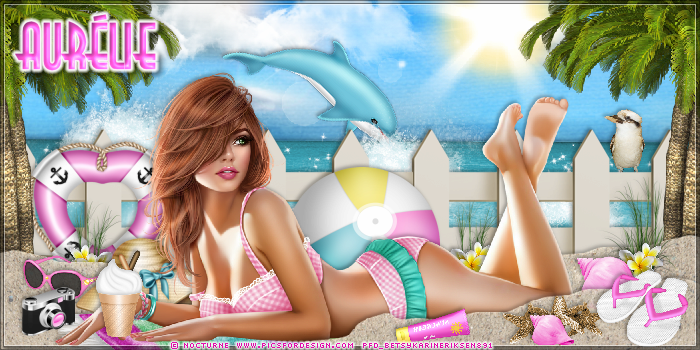
PTU-Tropical_Dreams - at the beach-watching the dolphin

Tropical Dreams Avatar by Betsy E to Kit maker AurélieTropical Dreams Banner by Betsy E to Kit maker Aurélie

PTU-Tropical Dreams at the beach-watching the dolphin
Nocturne-Forum set .

Written July 15th-2016

This tutorials is meant as a guide, feel free to make it your own way.
Any resemblance to any other tutorial or tag is purely coincidental.

Supplied used : 
Paint shop pro. I use an old version , psp 9

I used the tube Swim by 

(enter on the artist names for this tube )
 © Nocturne
The store  :
http://picsfordesign.com

Don't use it without a proper license .

kit by Purple Dreams Scraps ( by Aurélie ) which can also be purchased at
 http://picsfordesign.com
The kit
Tropical Dreams
Her blog
Purpledreamsscraps


Plugins : Alien Skin Eyecandy Impact 5 .
Can be downloaded from HERE
AAA Frames -Photo frame
Can be downloaded from HERE

I have used drop shadow V 2 H 2  , 60, 6
and for the name : 3,3,57,8


I have used a Free font , Angie

Abbreviations I use : *Dr.sh = Drop shadow . *Pr = Percent.  *el. =element from the kit.Remember to add dropp shadow and save often and name your layers , so you can easy see what element you working on.
Here we go :
File, new image 700 x 350

Open paper 06 , paste as a new layer

Resize 88 pr
Use el 40 -cloud, resize 40 pr, duplicate, move it a bit, and duplicate it again and mirror it.
I didn't merged these layers until I was finish with the tag, than I could easy adust them .

El. 15-the sea , full size , as a new layer
See where it's naturally to add it.
 El 38 resize 50 pr + 75 pr , duplicate 2 times, move them around where you like over the el.15 the sea, merge those 3 together, easier when you have less layers to work with .
El,51-sun, resize 75 twice, duplicate .

El. 44 the dolphin -40 pr , rotate right 45 degrees.
Add el.21-Wave full size, duplicate resize this 75 pr, duplicate this one , move this on the right site, place the middle one over the dolphin's nose/beak, 

El.60 - the fence , add it in full size .

El.50 -Bird , resize 20 pr. place on top of the fence, right site.
El. 57 , 30 pr. place it on the left site of the fence,

El.48 - palm tree, resize 75 pr. place it on the right site, in the edge of your image, duplicate , resize 75 pr again, duplicate again and mirror it , also mirror the first one that is only resized once .

El.10-Dune (sand ) resize 85 pr. place it on the right and down on your image, duplicate it ,mirror it, duplicate again and mirror this too. place them on both sites on your image.
Paste el.35 , resize 15 pr , duplicate it 2 times and el.11 resize 10 pr  duplicate it 2 times, and place them between between sand layers.
El.13-Sunglasses -25 pr. on the left site.
El.56 -hat, 30 pr.on the right site.

El.67-Ball-30 pr. place it on the middle in front of the fence.
Add your tube, if you use the same as I did, Nocturne(Swim + the towel ), resize 40 pr.
Place her center but a bit down, between the sand layers.
El.42 -25 pr. place it on the right between the  sand layers.

El. 27 - Sun cream -15 pr, place on top of your image.
El.41-15 pr. + 90 pr. El. 41 again and 15 pr + 75 pr.
El.42 -15 pr. El,69-sandals -25 pr. on the right site.
El.52-Camera -15 pr.place on the left site.
El. 16-20 pr. place it in front of the tube.


 If you happy with elements, tube and masks placements ,
you can merge all layers together, merge visible

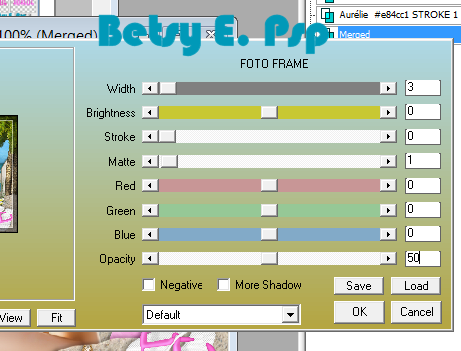
Be sure you add AAA Frames -Foto frame before you add copyright and name on , (or you can x-out it and copy merged, and paste in your workspace as a new layer )
Use these settings :

1-AAA FRAMES FOTO FRAME SETTING FORUMSET.png

Add copyright and merge down, 
Add you name , for my font Angie I use stroke 1,5 , size 45
foreground and background color #e84cc1
Convert to raster layer.
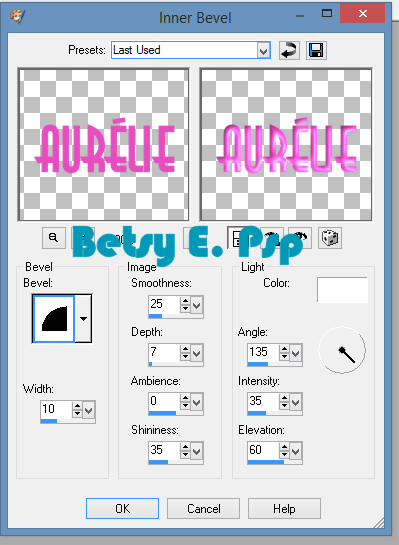
3D Innerbevel with these settings : 

2-3D INNERBEVEL NAME-CT TAG-FORUMSET-TROPICAL DREAMS.png


Go to effects, plugin 

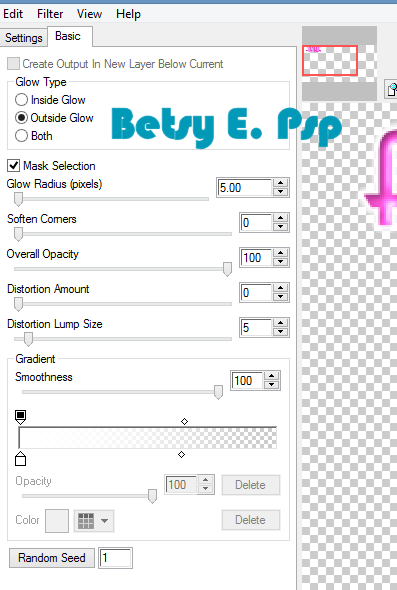
Alien skin Eyecandy Imapact 5 gradient glow,These settings :

Screen shot Plugin eyecandy 5 impact gradient glpw.png
Add dr.sh 3,3,57,8

Right click on your layer and copy merged and paste in your workspace as a new layer , save your tag as a png.
For the Avatar, I just open a new image, 150 x 200 pixel, copy elements from your banner, I did resized some elements 75 pr or 80 pr. and also mirrored the ball.
Use the same setting for the AAA frame.and copy your name from the banner, just resize 70 pr. and remember to add the copyright.

Now your done,Thanks for trying my tut, hope you liked it.

Any questions , please just email me
betsyfiltrerepost-paradisedreamer@yahoo.com
or add your question in the comment .